Window Trim Glow-Up
- Luecky Home

- Apr 18, 2023
- 3 min read
We love a good glow-up and nothing say upgrade more than adding some trim to a builder basic window. As part of week 2 of the #OneRoomChallenge we added trim to finish out the nursery window. It is a super easy and quick project that takes your windows from drab to glam in no time.
I knew I wanted a 1" thick sill to create a more substantial look. That requires 5/4 board since it will be milled to 1". We also had to take into account the depth of the window recess (5" for our windows) while adding a little overhang, in addition to the total width. The width included the actual opening plus the outside casing and a little overhang outside of the casing. With our window that meant trying to find a piece of wood that was 1" thick, 48" wide, and 7" deep.

Big box stores did not have 5/4 board and my local specialty lumber stores only had exotic species, which I was not going to be using if I was going to be painting these. Off I went to several stores trying to find good options. Early one morning, after being surprised that I didn't have to work, I went for some solo time at Home Depot and came upon these pine stair treads that were PERFECT! They were 1" thick, 48" long, and 11" deep, plus had a beautiful bullnose finish on side!

Once home, I measured the opening of the window to find my cuts for the stair tread. Our opening was 38" wide. We also had to make the cutouts to create the portion the outside casing would sit on, along with the intended outside overhang. We used 4" wide outside casing and wanted a 1" overhang on either side. This meant we had 5" on either side (total of 10") to add to the window opening.
With all of the measurements and details, you can see why it's important to start with doing the stool first (the bottom piece that goes into the sill). Once I had my cuts made we installed using 3" nails with our nail gun.
From there, we moved onto making the head jamb. This one did not need to be as substantial in thickness, but did need to account for the outside casing and an overhang. We used a primed 1 x 6 pine board and cut it to size the same way we did with the stool. This time we only left 1/2" overhang on either side of the casing.
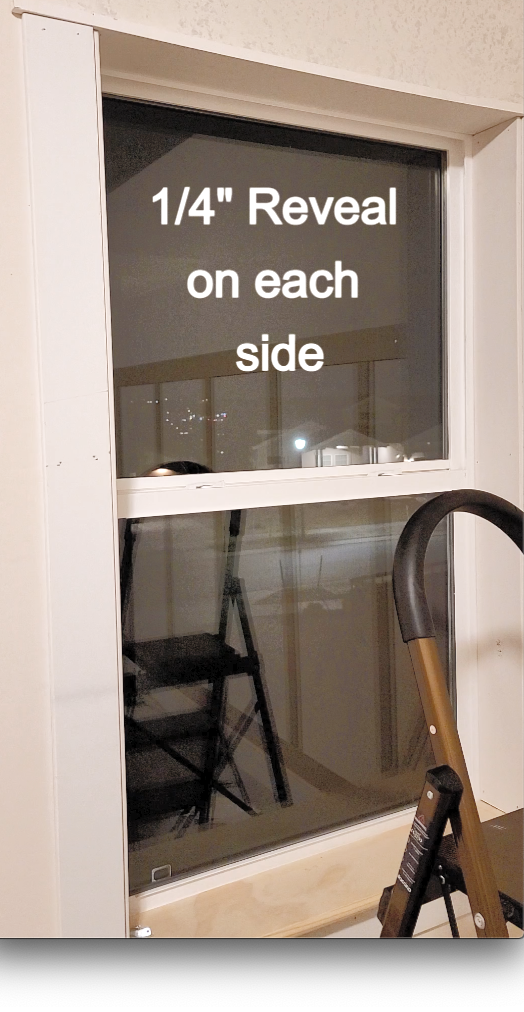
Now we were ready for the outside and inside casing. Since our window recess was 5", we used 1x 5 primed MDF baseboards for the inside casing and 1x 4 primed MDF for the outside casing. We left a 1/4" reveal between the outside and inside casing to give it that craftsman finished look. This means that there is a 1/4" lip where the inside casing is exposed and not overlapped by the internal edge of the outside casing.

After the casing was in place, we installed the apron (the piece under the stool/sill) using a primed 1x 4 MDF. piece Finally, it was time for the header. We had trouble deciding between a 1x4 or 1x5, but in the end went with the bigger boards as it made the window look more substantial and really drew your eye up, which was ideal for the design details we were doing in this room.
To finish this off, we capped off the header with 1x2 then 1x 3. Each piece had a 1" overhang on the piece below it that created a crowned look and made it look really grand.
The final piece in any trim work is recessing the nails, covering them with spackle, caulking the seams, and sanding to get ready for paint.

The before and after is a huge change in how big and much more of a statement the window now makes in the room. We plan to add trim to every window in our house. They may not be all this style, but we will definitely finish them out with inside and outside casing. Depending on the room we may add substantial headers and aprons or stick with a simpler look. That's the beauty of design, you can adapt these basic steps for the look you want!
Hope this helps and gets you inspired to upgrade your own window trim! Keep DIYing! Follow us on instagram for daily DIY tips and sign up for our newsletter for our latest blog posts!

_black_ed.jpg)


Comentários